Many years ago, my sister (-in-law), Judy, Retired2stamp, invited me to a Stampin' Up Party. I was drawn to the 6X6 recipe card swap our local group was doing and had wanted to scrapbook too. I wasn't really interested in card making because I had witnessed my brother (in-law) Ed fold up a handmade card and put it in his pocket. I almost fainted and I didn't even make the card. But after a few parties, I was hooked and now make more cards than I had ever thought I would. My most recent passions are ATCs, tags & altered art. As you look through my blog I hope you can see how I've grown in my crafting ability!
Showing posts with label 6X6 Recipe Card. Show all posts

Wednesday, December 8, 2021

Dip Anyone?

Maybe not my best design but this recipe is a must at our family gatherings!  The recipe card was for a swap I was in at our SCS Event.  I used the Italian flag colors & was lucky my good friend, Diane had a retired Stampin' Up Stamp Wheel of a hoagie!  I decided to use it for the background then color one with Copic markers, fussy cut it out & adhere over one on the background.  I used Stampin' Up Garden Green, White & Real Red cardstock & Real Red Ink.


TFL!

Wednesday, August 4, 2021

Strawberries & Cream!

This 6X6 recipe card was designed for The Craft Shack's 2nd Fast 'n Free Event.  

The strawberry vine is Dare 2B Artzy's...wait for it....Strawberry Vine stamp & die sets.  Sorry, I couldn't resist.

Lisa suggested using colored pencils for this project.  It had been a long time since I'd used them & it made something old new again!  The images were colored using Derwent Inktense Pencils.  This was quick & easy because I didn't need to color the entire images of the strawberries & leaves.  I just scribbled the color around the edges of the strawberries & the veins of the leaves.  The color on those images were smoothed & blended using Spectrum-noir Gamsol Blending Solution with a Pro-art 3 Blending Paper Stump.  I did add a little more color to make them darker & used more Gamsol,  After I added the recipe the vine was popped up using Scrapbook Adhesives3l 3d Foam Squares.

The recipe was provided & tested by my friend, Mary Ann Hicks.  Looks delicious doesn't it?


Thanks for looking!


Monday, September 21, 2020

Mississippi Moo

It's been a while since I've done any crafting & it just so happened that Lisa was having a Fast 'n Free event at The Craft Shack.  I designed this recipe card for 1 of the 3 projects that were free to her customers.   It was pretty simple & lots of fun making the grass & sky!!.  

The recipe was printed on a piece of 8 1/2 X 11 white card stock then cut to 5 1/2 X 5 1/2.


The cow was stamped on a small piece of white CS using a clear embossing dabber then heat embossed with Rusty Hinge embossing glaze.  After the cow was die cut, it was temporarily adhered to the recipe card so it would have the grass & clouds on it.  The cow was stamped again on masking paper with black ink, fussy cut out then placed over the embossed cow to protect it.

For the grass, I watched a Lawn Fawn video which explains how to use their stencils/masks.  It's a very cool process!  Using the Grassy Hillside Stencil (there are 3 stencils in the pack), I did the top row of grass first by applying Twisted Citron Oxide Ink then a little Peeled Paint Oxide Ink with blending brushes.  I then chose another grass stencil & did the bottom row.

Again, following the directions in the video, the clouds were done using Broken China Ink for the first 2 top rows then Tumbled Glass Ink the remaining clouds.  I kept turning the stencil for each rows, working my way down the recipe card.  When I got to the last row I used the grass mask to cover the grass & blended the final bit of tumbled glass.


To finish up, the mask was removed from the cow (& kept to use another time) & then the oval was removed from the recipe card.  Dimensionals were added to the back of the oval & adhered back onto the recipe card lining the grass & clouds up.  Then all 3 layers were put together.


Saturday, December 28, 2019

Hmmm...Smell the Cinnamon!

My mojo was pretty much gone for the December Recipe Card Class at The Craft Shack so Mary Ann & Lisa gave me a hand in designing the card.  This recipe was shared by our stamping friend, Karen at our annual stamping event.  They were delicious!
It's pretty basic except for the "cinnamon buns" at the bottom.  I wanted to place something on the recipe card that represented cinnamon buns so we used the Tim Holtz Peppermint Shifter Stencil.  I mixed Ranger Texture Paste with drops of Tim Holtz Walnut Stain Reinker then added cinnamon spice.  I didn't measure anything but kept experimenting until I got the color I wanted & a consistency to spread over the stencil.  We then sprinkled some chunky glitter like elements over it to represent the pecans.  After letting it air dry, the edges of the strip were inked & popped up.  And yes, you can smell the cinnamon...mission accomplished!!

The 3 layer base is SU Kraft, Cherry Cobbler & a Maja Design DSP.  The cook, from a retired My Favorite Things Stamps Set "What's Cooking", was colored with Copic markers, die cut with an oval, inked then popped up.  The natural twine bow was added with a glue dot.

We were happy how it turned out & the smell makes you hungry!!

TFL!!

Monday, December 16, 2019

Watch Out For Spiders

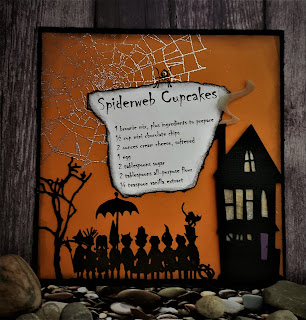
Judy, Lisa & I had a good time designing this recipe card for a class at The Craft Shack.  Judy had the recipe & it was perfect for our October class & I made them as a treat for the class.

Starting with SU Pumpkin Pie CS cut to 5 3/4" X 5 3/4, the spider web was stamped with embossing ink then heat embossed with silver sparkle enbossing powder.  The edges of the CS were distressed with black soot ink.  It was then adhered to black CS cut 6 X 6.

Using a stamping platform tool, the trick or treaters were stamped with jet black archival ink.  Using a stamping platform is the only way to go because you can re-stamp it if you don't get a good image.

The tree & ghost house were die cut from black CS.  Lisa added several elements to the back of the ghost house including cheesecloth & yellow CS in the windows plus purple CS for the front door with a black dot for the door knob!  The smoke coming from the chimney was cut from vellum then inked with hickory smoke & adhered with a glue dot.  The ghost house was popped with dimensionals.  Two trees were stacked together & adhered using a fine point glue pen.

The recipe was torn then sponged around the edges with black soot & adhered to the pumpkin pie layer.  The spider was stamped in black soot over the spider web & recipe.  It needed a little sparkle so a red dot was added to the spider.

Below is a photo of the cupcakes & not only were they delicious but fun to make too!


What a Catch!

The September recipe card class at The Craft Shack was a recipe from a friend of mine & is what I'd call comfort food!


The 2 layers of Stampin' Up CS were cut Tempting Turquoise CS 6X6 & Whisper White CS 5 3/4 X 5 3/4.

The background was made by randomly swiping Tim Holtz Distress Cracked Pistachio Ink Pad over the white CS.  This gives the effect of swirling water.  The underwater foliage from Tim Holtz Sea Life stamp set was randomly stamped in evergreen bough.

Charlie Tuna & his trademark symbol came from the Internet.  He was colored with Copic markers & fussy cut then popped up with dimensionals.

A hole was punched in the matted recipe & an Eyelet Outlet Fish Hook was added then a line was drawn with a silver marker for the fish line,

It needed a little bling so I picked out some clear sequin from Neat & Tangled Mermaid Tail Sequin Mix to appear as the bubbles.

TFL!

Tuesday, November 12, 2019

Love Those Boats!

This recipe card was for the August class at The Craft Shack


It was a very simple recipe card using Stampin' Up retired DSP, Whisper White CS & Certainly Celery CS.  The bling was a silver nail head I had in my stash.  The Stamps by Judith's large colander was stamped in Versamark then heat embossed with clear embossing powder.  It was fussy cutt out then popped up with dimensionals.  I'm not sure where the tomatoes & zucchini stamps are from but they were stamped in Memento Tuxedo Black Ink then colored with Copics R24, R27, YG23, YG63, YG67  then fussy cut out & adhered to the back of the colander before it was added to the card.

TFL!!

Tuesday, August 13, 2019

Three Little Pigs

I love putting my favorite recipes on 6X6 scrapbook style cards.  I can't remember where I found this recipe but it just needed a farm scene!


I didn't want to pop any of the images up so I did a lot of masking using Gina K Designs Masking Magic Sheets. The stamp set is an old SU set, On The Farm, I found at a flea market!

I started by stamping 3 pigs & the barn on the masking sheets & cut them out just inside the line.  If you do this, when you stamp over the masked image you won't have any gaps in your stamping.  But if you do just use a marker to touch up the lines.

On white cardstock cut 5 1/2 X 5 1/2, I stamped the pigs with Memento Tuxedo Black Ink then placed the making sheets over the images.  Then I stamped the barn over the 1st masked pig so it appears it is walking in front of the barn.  Next I placed the mask over the barn & stamped the tree from Tim Holtz Just Believe Stamp Set several times so it appears the trees are behind the barn image.  The trees were inked with Peeled Paint, wiped the trunk off & added ink using a Frayed Burlap marker for the left tree.

Leaving masking on the pigs & barn, I used a mini ink blending tool to carefully add the background colors in Tim Holtz Distress Inks, Tumbled Glass, Peeled Paint & Squeezed Lemonade.  I did the sun before the sky.

After removing the masking, I colored the barn & pigs using Copic markers & added glossy accents to the roof.  The base is 6X6 SU Cherry Cobbler cardstock & the 5 3/4 X 5 3/4 cardstock mat is white.

TFL at my Three Little Pigs & hope you give masking a try!

Friday, January 19, 2018

A Lovely Bunch of Coconuts

My latest recipe card is for coconut cream pie & it came from my nephew, Sean. I made the pie for my youngest son's birthday & decided it would be a good companion recipe card for Pam's Pie Crust that I did a few months ago.


It's hard to believe I didn't have any DSP that fit the recipe so I made my own background with a flourish stamp...can you envision the monkey swinging through the trees? The coconut tree trunk is a 1/2" strip of CS that was torn in small pieces then overlapped & adhered back together. The leaves were hand drawn then fussy cut.  I used fringe scissors, cutting at an angle to finish them off. I collaborated with my bestie, Lisa to design the coconuts.  We used a grass stamp on CS then embossed it with a flat EP.  Once cool, 3 circles were punched out then fussy cut around the edge so it didn't have a perfect shape. We used a stylist so it had a slight curve then they were added using dimensionals. The monkey was colored with Copics then fussy cut out & is holding a sauce pan brad.

Thanks for looking & hope you enjoyed my project!


SUPPLIES: SU Cardstock - Chocolate Chip, Vanilla, Wild Wasabi, Pumpkin Pie, Crumb Cake; Ink - Ranger Archival Jet Black, Tim Holtz Shabby Shutters; Stamps - Hot Off The Press Cute Monkey, Tim Holtz Stampers Anonymous Sketch Elements, Judith & Heather Grass ; Misc - SU Fringe Scissors, Eyelet Outlet Pan Brads, Heartfelt Creations Flower Shaping Essentials, Copics E53 & E57, Tombow 992, WOW Clear Embossing Powder.

Friday, December 8, 2017

Peppermint Sugar Cookies

I designed this 6X6 recipe card for the December class at The Craft Shack.  I knew I wanted to use bright red & candy canes but that was it.  Then I attended a Dickens event  & found my inspiration!  Below are details on how I made the recipe card & a photo of what inspired me.

Sorry the photo is blurry but the white mat was stamped with Tim Holtz Flurry Stamp in Distress Candied Apple Ink & adhered to the SU Real Red CS base.

The snowflakes from Tim Holtz Reindeer Flight Stamp Set were stamped on the next layer of white with Tim Holtz Embossing Ink & sprinkled with Ranger Clear Embossing Powder then heat embossed.  That was added to the base layers.  Next the title & recipe were matted & added.

The candy canes were cut from Neenah Premium 110 lb Extra Heavy CS on my Cricut with Joys of the Season cartridge.  Once cut, I stamped them at an angle with Tim Holtz Stripes Background Stamp in Candied Apple Distress Ink.  After the ink dried, I applied embossing ink then covered them with Ultra Thick Embossing Enamel & heat embossed.  I repeated this step so it looked very shiny & thick...like a candy cane.  They were crossed & held together with Ranger Glossy Accents. 

Two pine boughs from Tim Holtz Holiday Mini Greens Dies were cut from Tim Holtz Core-dinations 12-x-12-Cardstock.  They were snipped apart, layered & glued together to form a swag.  Tim's Beaded Berries were dipped in Candied Apple Distress Spray Stain & the stems were colored with a Peeled Paint Distress Marker then added with a glue dot.  I used a glue dot to adhere the swag to the candy canes then wrapped red jute twine around the greens & tied 2 silver Tim Holtz Tiny Bells on with the same twine & tied a bow.  I added the candy canes to the recipe card using mini glue dots & Scor-Tape.

Don't you just love my inspiration?  We attended Dickens of a Christmas Celebration in Wellsboro, PA where I purchased this hand made candy cane door decoration in deep red from a street vendor.  I think the candy canes on the recipe card look pretty close...don't you?


Thanks for looking!!

Sunday, November 12, 2017

Easy Peasy Hors d'oeuvre

This easy recipe came from my stamping friend, Tina.  I made 12 for the recipe swap at our recent Stamp & Swap Event.  This recipe card is pretty straight forward.  I stamped a pineapple in Hello Honey on the same color CS then made a cute little tab with the pineapple brad through it.  The edges were sponged.  The hardest (or most time consuming) was make the title!  TFL!


SUPPLIES:  SU Very Vanilla, Hello Honey & Cajun Craze Cardstock; Bo Bunny Kiss the Cook CS; SU Hello Honey & Cajun Craze Ink; SU Burlap ribbon; Stampabilities Pineapple; Eyelet Outlet Pineapple Brad; EK Success Mini Corner Rounder; Ranger 1/2" Double Sided Tape

Sunday, November 5, 2017

He's Hammered!

No, the chicken isn't drunk, he was pounded & the guy in the window is horrified!  I designed this recipe card for a class at The Craft Shack to demonstrate how to use an embossing diffuser & an easy way to line up punches.
, 

I wanted to emboss the title panel but didn't want the words or chicken embossed so I used a diffuser.  The panel was arranged in the embossing folder & closed.  The rectangle diffuser was centered on the embossing folder so the title was at the bottom of the diffused area which left room at the top for the chicken to be stamped.  I used re-positionable tape to hold the EF & the diffuser together.  The diffuser replaces one of the plates so I placed it down which helped stop it from slipping.  So the sandwich  for the Big Shot was:  platform, diffuser, EF, cutting plate.  BTW I lightly inked the "wire" with pumice stone distress ink.

To make the window, I punched four 1" squares & used temporary adhesive to position them on a piece of  3" X 3" white CS leaving a 1/8" gap between each square.  I slid the CS into the punch so the 1" square was lined up in the opening at the back.  After all 4 squares were punched out I trimmed the sides to 1/8". 


The front of the card was so full that I put the directions on the back.  I love making these recipe cards, especially if I can put something a little snarky on them!  TTFL!!

SUPPLIES:  Sizzix Tim Holtz Alterations Embossing Diffuser 2;  Cuttlebug Chicken Wire Embossing Folder; Moda Scrap Wood Effect 6X6 Paper Pack; Art Impressions UMD1878  Flat Chicken; Judith & Heather H-70 Chicken; SU Basic Gray & Whisper White Cardstock; EK Tools 1" Square Punch; Memento Tuxedo Black Ink; Ranger Tim Holtz Pumice Stone Distress Ink; Copic YR04, YR14, R56, C1.

Thursday, October 5, 2017

Aww, nuts

My SIL, Pam & I collaborated on this recipe card for The Craft Shack's September Recipe Class. Pam had this yummy peanut butter icing recipe & she wanted to use her Inky Antics Scented Smiles Peanut Stamp Set and Scratch 'n Sniff Stickers.  The set has the cutest stamps with scented stickers.  We placed a clear sticker over the peanut butter jar so when you scratch it you can smell peanuts! After Pam picked out the papers, I found a recipe card by lorie64 on SCS & using her basic layout this is what we came up with.


Other supplies - Maja Design Denim and Friends12x1 Paper, SU Night of Navy & Very Vanilla, Copics, SU Oval punches, Twine, Wooden Button, twill ribbon.

Wednesday, August 2, 2017

Sweetie Pie

The recipe for the August class at The Craft Shack is from my SIL, Pam N.  She's makes the most delicious pies & when I saw Darice's stamp set, Sweetie Pie, I knew her recipe would be perfect.  I used the pie from the set & it comes with matching tin pins which are ssoooo cute.  There are several other sets that also have matching tin pins & cute sentiments which work for projects other than recipe cards.


I wanted the recipe to look vintage but at the same time fit the cute look of the stamp. I typed it using different fonts & underlining which made it look like the index cards our mother's used.  It was printed on SU Whisper White then stamped with a set of  measuring spoons in
Memento Black.  I randomly blended Antique Linen Ink over the card to make it look "loved" & matted it on SU Red Riding Hood CS.

I made my own background by stamping the pie then randomly stamping the fruit in Memento Black Ink on SU Whisper White.  The pie crust was done with Copics E31 & E53 then I gently went over it with a blender pen to lighten the color; The hearts are R27; the pie plate is B32 & also gently gone over with a blender pen.  The cherries were colored with R37, R39 & G99; the bananas are Y15 & the applies are E0000 & R39.  I didn't want it to look so white so I stamped speckles from SU Gorgeous Grunge in Antique Linen.

After putting the layers together-SU Red Riding Hood base, Maja Design Summertime Light Scarlet Gingham then the stamped white background, I attached the tin pin & rolling pin with Glossy Accents.  The handles on the rolling pin from KaiserCraft's Wooden Flourish Cooking Pack were colored with a SU Red Riding Hood Marker.  Then I put Glossy Accents over the handles to give it a little dimension.

I think this is one of my favorite recipe cards...or have I said that before!  Hope you enjoyed & TFL!

Friday, June 9, 2017

A Bowl of Yum

Time for the June recipe card class at The Craft Shack!  This tasty recipe was submitted by Diane Z. & I designed it with a little inspiration from Pinterest. I've never done anything with an Asian theme & I really like out it turned out. 
The bowl was made following Alex's Creative Corner idea by punching SU Rose Red CS using the SU Designer Label Punch then cutting it about in half.  It was stamped in black Archival Ink using the corner stamp from Penny Black's Oriental set.  The bowl was trimmed using SU Basic Black CS.  The chopsticks were hand cut from SU Natural CS & attached to the back of the bowl then it was popped up.
The idea for the hanging screen came from Maylee's lantern card.  The branch from Penny Black's Oriental set was stamped at an angle with black Archival Ink on SU Rose Red then run through a paper crimper.  It was trimmed so there were tabs at the top, & bottom for the hand cut fringe.  It's decorated by punching SU Basic Black Cardstock with a SU Scallop Trim punch & adhered to the back using Scor Tape.  The tiny white pearls were colored with gold Wink of Stella then placed at the top & bottom.. 
The lanterns from the same Penny Black set were stamped with Memento Tuxedo Black Ink, colored with copics YG63 & R85 , fussy cut out then the fringe was cut apart.  Clear Wink of Stella over the leaves gave it a little sparkle & a line was drawn on the DSP with a gold marker to "hang" the lanterns.  (Ignore the little white spot on the right lantern it's not on the original?)
The SU Very Vanilla recipe card & SU Basic black mat were cut with the SU Window Framelit die.  The black mat was cut in half then adhered to the back of the recipe card & popped up.                                                                                                                         After adhering the gold trim ribbon to the center of the Bazzill Glamorous Vintage Lace DSP it was matted in SU Basic Black then all the elements were adhered.                                                                                                                                                                  TFL!!

Wednesday, May 3, 2017

It's A Bit Of A Tomato!

I just love fresh bruschetta so why not make a recipe card & no better time than for the May recipe card club at The Craft Shack's class.

 Maja Design "I Wish"
I selected SU Red Riding Hood for the base because it reminded me of a tomato.  I had a hard time matching the DSP until I found the plaid in the Maja Design "Summertime" Collection. From there I added the strips of paper from "I Wish" & SU Always Artichoke cut at an angle.   The letters were cut using my Plantin Schoolbook Cricut cartridge.  I used one of my favorite dies, Cheery Lynn Designs "Fanciful Flourish" for the vines & it comes in a larger version too.  The tomatoes are from 2 sets, Clear & Simple "Fresh From the Garden" & PJK Design / Cookbookin' "Eat Your Veggies".  I stamped them in Memento Rhubarb Stalk then colored them with Copics R35, R37, R39 & YG63 before fussy cutting them out.  Of course I had to add a little bling, 2 gems from my stash!

Hope you enjoyed & TFL!

Sunday, April 16, 2017

I 💖Philly!

I have a lot going on this month so I needed this project to serve 2 purposes...the The Craft Shack's monthly recipe club & a swap at a Splitcoaststampers event in Ilion, NY.  This is a recipe I saw on FB & not sure who to give credit to but it is delic!


The Hero Arts Silly Scape stamp isn't as wide as the 5 3/4 SU Natural cardstock so I used my stamp-a-ma-jig.  First I stamped the image in Jet Black Stazon on acetate then used a stamp-a-ma-jig to position it on the cardstock, removed the acetate & stamp the image in Coffee Archival Ink.

I moved the acetate to the left & lined it up with the 1st image I stamped.


Removed the acetate & stamped the 2nd image.


Exactly what I was looking for.


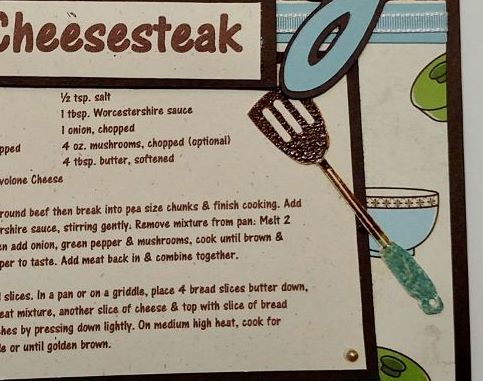
The roof tops of the buildings were colored with Copics (R29, B00, B95, G24, Y02) & Glossy Accents was put on the face of the clock.  The TPC Studio So Delish Everything but the Kitchen Sink DSP was bumped up to the natural CS & taped on the back.  The seam is covered with a strip of SU Baja Breeze CS & matching SU ribbon over it then adhered to the SU Chocolate Chip base.  The 2 1/4" letters were cut in SU Chocolate Chip & Baja Breeze using Cricut's Cursive 101 cartridge.

The spatula is from a Studio G stamp set & was stamped in Archival Coffee & SU Baja Breeze inks then embossed with WOW Clear EP.  Its fussy cut out & adhered under the "Y".  I added Zva Taupe Pearls on 3 of the corners of the recipe.

Well thanks for looking & hope you visit next month!

Friday, February 3, 2017

Ole'

Another good recipe for our Recipe Card Class at The Craft Shack!  I decided on a chicken recipe I saw on FB awhile ago.  I'm sorry I don't remember who it came from but I did make a few changes & it's one of our favorites!

After a little research on colors & patterns from Mexico, I decided to use SU Sycamore St DSP.  I really liked the other side but the pattern was to big...anyway along with it I used SU Tangerine Tango, Not Quite Navy & Ruby Red CS for the mats & trim.

After I printed the recipe & cut it out I stamped Judith & Heather's "Tall Bird" I124 in Memento Tuxedo Black using Inkadinkado's Stamp-a-ma-jig.  This helped me make sure the image didn't cover a lot of the words or be stamped off the CS.  I don't think he's really a chicken but for this project he is, so I decided to leave him white.  His beak & tail feathers are colored with Copic R24, his feet are Y35 & the image is shadowed by going around it with Tombow N95.

My SIL, Judy let me use a stamp which included the image of the sombrero.  I colored it using Copics YR04, R24, B97, Y35, BG23 & outlined the band with a black Sharpie Fine Pen before fussy cutting it out.  Once the card was assembled the sombrero was popped up with Scrapbook 3d White Foam Squares.

The trim is a die from Elizabeth Craft Designs Jewels 1 Set cut from Tangerine Tango & Not Quite Navy then weaved together before adhering with a Tombow glue pen.  It needed a little bling so I added Starform Transparent Glitter Stickers to the trim.

I love putting my favorite recipe on these special cards & hope you enjoyed reading how I did it. Thanks for visiting my blog & if you like my creation feel free to leave a comment.

Saturday, November 5, 2016

Breakfast Strata Recipe Card

I love doing recipe cards so of course I participated in the swap for our Jingle All The Way SCS Event!  I usually make this recipe for breakfast on Christmas morning so it was perfect!
The Judith & Heather images are stamped in Memento Tuxedo Black Ink then colored with Copic markers.  One little trick Judith does is outlining everything with a light gray & I think the shadowing makes the images pop. They were then cut using MFT Oval Wonky Stitched Dies.  After I printed the recipe I die cut it with a MFT Square Wonky Stitched Die.  I wrapped a piece of SU ribbon around the top of the DSP, added a bow then adhered it to the SU Baja Breeze CS.  The panels on the right were adhered down & the oval on the left is popped up using white 3d foam squares.

TFL!!

Saturday, April 30, 2016

Nobody Knows The Truffles I've Seen

This recipe card was for the April Recipe Card Club class at The Craft Shack.  I've been wanting to use this stamp set for a while & finally had the opportunity!  The best part was one of my BFFs, Mary Ann made the truffles so everyone in the class was able to taste test the recipe!!  I decided on a criss cross card & followed most of the instructions on Splitcoaststampers by Beate.  

The BASE is SU Very Vanilla.  Beate cut a 12 X 12 in half but since they don't sell 12X12 anymore (bummer) I used two pieces of 8 1/2 X 11.  I wanted to mat the base card so I cut them to 5 3/4 X 11 & scored at 5 3/4".  All scraps were used later in the project for the tag & images.

To make the FLAP, I measured up 2" on the short side & placed a tic mark.  On my cutter, I lined up the score line with the tic mark & cut.  The 5 3/4 X 5 3/4 sides were adhered together to form the back then placed on a 6 X 6 SU Early Espresso mat.

To make the PANELS, I measured the front flap & made a template. Using the template, I traced it on the back of the SU Springtime Vintage DSP.  Remember you need to flip the template because the flaps are opposites!     After cutting the DSP, it was adhered to the base.

The LACE is punched using the Martha Stewart Lacy Scallop Punch from the leftover 2 1/2 X 11 strip. I punched down both sides then trimmed each side to 1/2" wide.  Once it was adhered, I trimmed the ends at an angle.

For the TAG, I stamped the sentiment on Very Vanilla in Black VersaFine & punched it out using the SU Designer Label Punch.  I punched again using Early Espresso then cut it in half lengthwise to make the label mat.  I closed the flaps & attached the tag to the left flap using a 3D foam squares & to the right flap using a small Velcro dot.

For the IMAGES, I stamped Tillie (that's what I named her), the table & roses in Memento Tuxedo Black & the truffles on the recipe card & tag on VV in VersaFine from Scrap Lounge's Grammy's Truffles Stamp Set.  I used various colors of Copic markers to color them.  I used a color that matched the background DSP to color between the roses & the table legs so when I fussy cut them, I could just go around them & not worry about cutting between the small spaces.  The vase of roses was adhered to the table, then all of them were adhered to the DSP.
The RECIPE was printed on VV so you would just see the title & stamped truffles when the flaps were closed.  I used an inverted corner punch before adhering the recipe to the 5 1/2 X 5 1/2 piece of SU Springtime Vintage that was adhered to the base on the inside.

I used GLOSSY ACCENTS on the truffles, Tillie's glasses & roses to give them a little dimension.

Fun card.....TFL!!