Many years ago, my sister (-in-law), Judy, Retired2stamp, invited me to a Stampin' Up Party. I was drawn to the 6X6 recipe card swap our local group was doing and had wanted to scrapbook too. I wasn't really interested in card making because I had witnessed my brother (in-law) Ed fold up a handmade card and put it in his pocket. I almost fainted and I didn't even make the card. But after a few parties, I was hooked and now make more cards than I had ever thought I would. My most recent passions are ATCs, tags & altered art. As you look through my blog I hope you can see how I've grown in my crafting ability!

Monday, October 19, 2020

Open If You Dare!

This is not only a Halloween card but a birthday card too.  My friend, Mary Ann has an October birthday & she loves everything Halloween.  I  recently saw a similar card but unfortunately I can't find it again to give credit for my inspiration.


The white card front was cut 5 1/4 X 4 from SU Thick Whisper White then inked with Tim Holtz's Crackling Campfire, Spiced Marmalade & Fossilized Amber Distress Ink.
Using Tim Holtz's Stamp Platform, the spooky house from his Haunted House stamp set was stamped in his Archival Black Soot Ink.  It was also distressed with a little Pumice Stone Distress Ink.
Tim's Tangled Twigs was cut from his Kraft-Core Nostalgic Brown Cardstock. Once cut, it was gently sanded.


The ghost is vellum, cut with Tim Holtz Village Graveyard Die.


The ghost was then inked on the back with Tim's Pumice Stone Distress Ink


The card front & Tangled Twigs die cut were sprayed with Tim's Brushed Pewter Mica Spray


To complete the project the ghost was woven into & adhered to the Tangled Twigs die cut.  It was then adhered to the card front leaving a narrow reveal & added to the SU Basic Black card base.

The final detail was "open if you dare" from Tim's Regions Beyond Stamp Set.  It was stamped on white cardstock, hand cut, inked with Pumice Stone Distress Ink & popped up.  

Hope you like my creation & thanks for looking! 


Monday, September 21, 2020

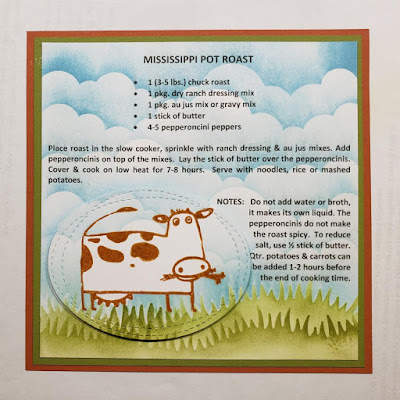
Mississippi Moo

It's been a while since I've done any crafting & it just so happened that Lisa was having a Fast 'n Free event at The Craft Shack.  I designed this recipe card for 1 of the 3 projects that were free to her customers.   It was pretty simple & lots of fun making the grass & sky!!.  

The recipe was printed on a piece of 8 1/2 X 11 white card stock then cut to 5 1/2 X 5 1/2.


The cow was stamped on a small piece of white CS using a clear embossing dabber then heat embossed with Rusty Hinge embossing glaze.  After the cow was die cut, it was temporarily adhered to the recipe card so it would have the grass & clouds on it.  The cow was stamped again on masking paper with black ink, fussy cut out then placed over the embossed cow to protect it.

For the grass, I watched a Lawn Fawn video which explains how to use their stencils/masks.  It's a very cool process!  Using the Grassy Hillside Stencil (there are 3 stencils in the pack), I did the top row of grass first by applying Twisted Citron Oxide Ink then a little Peeled Paint Oxide Ink with blending brushes.  I then chose another grass stencil & did the bottom row.

Again, following the directions in the video, the clouds were done using Broken China Ink for the first 2 top rows then Tumbled Glass Ink the remaining clouds.  I kept turning the stencil for each rows, working my way down the recipe card.  When I got to the last row I used the grass mask to cover the grass & blended the final bit of tumbled glass.


To finish up, the mask was removed from the cow (& kept to use another time) & then the oval was removed from the recipe card.  Dimensionals were added to the back of the oval & adhered back onto the recipe card lining the grass & clouds up.  Then all 3 layers were put together.