For the November ATC class at The Craft Shack, I designed this one with Thanksgiving in mind. I love to take a technique & make a miniature version so I decided to make an eclipse ATC.
I started by inking white cardstock with Tim Holtz Antique Linen. The leaves from Tim Holtz Leaf Prints are randomly stamped off the edge with Ranger Archival Inks - Library Green, Monarch Orange & Plum. I then die cut GIVE with Tim Holtz Alphanumeric 1" Tall Dies. A piece of May Arts Burlap String was wrapped around the CS with a Tim Holtz Pine cone tied with a bow. This layer was then adhered to the SU Tangerine Tango base. Using slivers of foam tape, the letters are placed back in the negative space. It was finished by adding a "thanks" from Tim's Chit Chat Seasonal Stickers.
It was a quick, fun ATC to make. TFL!!
Many years ago, my sister (-in-law), Judy, Retired2stamp, invited me to a Stampin' Up Party. I was drawn to the 6X6 recipe card swap our local group was doing and had wanted to scrapbook too. I wasn't really interested in card making because I had witnessed my brother (in-law) Ed fold up a handmade card and put it in his pocket. I almost fainted and I didn't even make the card. But after a few parties, I was hooked and now make more cards than I had ever thought I would. My most recent passions are ATCs, tags & altered art. As you look through my blog I hope you can see how I've grown in my crafting ability!
Showing posts with label ATC. Show all posts
Thursday, November 9, 2017
Monday, November 7, 2016
Jingle All The Way
The theme of our 2nd SCS Event is "Jingle All The Way" so I decided to use it in my ATC. There are 10 people in the swap so it wasn't too bad making them.
The cardstock is SU Cherry Cobbler cut 3 1/2 X 2 1/2, Night of Navy & Basic Black cut 3 3/8 X 2 3/8. The free printable Jingle Bell music was resized to 3 1/2 X 2 1/2, printed on SU Whisper White CS & trimmed to fit the black.
The sentiment from SU's Jingle All the Way set was done in 2 steps using my mini misti because it is one stamp & I could bear cutting it in half. I inked "jingle" with a Versamark pen, embossed it in WOW White EP then moved the stamp & repeated the step with "all the way". Even though I did "jingle" for all 10 then moved onto "all the way", it was still a little time consuming but I like the look plus then the stamp fit portrait style.
I placed the sheet music over the black CS leaving enough room for the sleigh & horse from SU's Sleigh Ride Edgelit at the top. After die cutting, I used the impression left by the die on the sheet music as a guide to hand trim it to match the curve of the cut. I distressed around the edges of the music with frayed burlap ink.
I sprayed the Night of Navy & Basic Black layers with Ttsukineko Shimmer Frost & Sparkle Spritz for a snowy effect. After adhering the music to the black, I trimmed off the bottom after the 3rd line of the sheet music. After that layer was adhered to the navy, I wound natural twine thread around it & tied on a rusty bell before adhering it to the base.
Hope you enjoyed my ATC swap project! TFL!
Tuesday, October 11, 2016
Spooky!
I love doing ATCs & if it's interactive I love it even more! I saw a video by Craftin Desert Divas Happy Halloween for an interactive card. It inspired me to do this floating ghost inlaid card for this month's ATC Club at The Craft Shack. I did make several prototypes before I was happy with the inlaid tree so if you try this I hope it saves you a little time & maybe frustration!
There's a short video at the end, it's not very good but it shows how the ghost floats & swirls around!
I used 3 pieces of cardstock-Georgia Pacific White for a backer, Neenah Premium 110lb Extra Heavy CS for the ATC front & SU Early Espresso. I used thicker CS to make sure the Impression Obsession's Bare Tree would lay flat when inlaid so the ghost would glide up the ATC smoothly. The backer made the inside smooth once the tree was inlaid. The CS is cut 4 1/2 X 4 1/2. It sounds big for an ATC but it was easier to inlay the tree so I didn't have so many tiny pieces to add. You 'll see why later.
I started with the thick CS. I laid the tree die on the CS as far to the right as it would go without being off the edge, decided where to place the moon then removed the die. I blended scattered straw ink in that area for the moon.
There's a short video at the end, it's not very good but it shows how the ghost floats & swirls around!
I used 3 pieces of cardstock-Georgia Pacific White for a backer, Neenah Premium 110lb Extra Heavy CS for the ATC front & SU Early Espresso. I used thicker CS to make sure the Impression Obsession's Bare Tree would lay flat when inlaid so the ghost would glide up the ATC smoothly. The backer made the inside smooth once the tree was inlaid. The CS is cut 4 1/2 X 4 1/2. It sounds big for an ATC but it was easier to inlay the tree so I didn't have so many tiny pieces to add. You 'll see why later.
I started with the thick CS. I laid the tree die on the CS as far to the right as it would go without being off the edge, decided where to place the moon then removed the die. I blended scattered straw ink in that area for the moon.
Then I blended walnut stain at the base of the tree, chipped sapphire around the moon & a little dusty concord at the bottom of the sky. To distress the moon, I went over it slightly with chipped sapphire.
I used the same inks on the backer CS so when the tree was inlaid the white CS wouldn't be seen if it didn't fit perfect. The tree was die cut from the early espresso & the thick CS (as far to the right without going off the edge). I used the brown tree & the negative of the background. When removing the tree from the inked background CS I saved the 4 tiny pieces in the black box. Also this die isn't really made to be inlaid & it cuts a small hole towards the top left which I made sure stayed in the background CS. I covered the hole with an embellishment later.
In the next step I wet my brush slightly & applied a thin coat of liquid glue over the entire backer. This is where it gets a little tricky, working quickly I put the ATC front over the backer, making sure the branch areas are laying straight & didn't get pushed to the side. The first time I had a little trouble & that's when I decided to ink the backer CS. Then I inserted the tree & the 4 tiny pieces I saved from the background. I really like how the moon appears from "behind" the tree!
Once the glue dried, I cut the piece into a 3 3/8 X 2 3/8 for the ATC front & inked the edges.
After cutting the tombstone from SU Going Gray with the smallest die from Spellbinder's Labels 11, I cut it off at an angle, distressed it with pumice stone ink then with a Sharpie fine point pen hand wrote the epitaph.
I added the tombstone to the left side of the ATC front using 2 layers of small pieces of 1/2" black adhesive foam tape. They are only on the left side, bottom & lower half of the right. This will allow the ghost to "hide" behind the tombstone.
The slider is made from chipboard cut approx. 4" long & 1/2" wide. I sanded the edges smooth & inked it with chipped sapphire. Then I added a tiny thin magnet to the end. The slider will be sealed between the ATC front & back.
This ATC is thick because of the magnet on the chipboard slider & I didn't want a lot of white showing on the edges so I used 1/2" black adhesive foam tape down the sides & across the bottom. I measured & cut each piece then cut it in half & stacked it so it ended up being 1/4" wide. The channel is at an angle & it starts behind the tombstone. I used 1/2" white foam mounting tape, cut it in half & stacked it. I made sure when I put the tape down that the factory edge faced the inside of the channel so there were no rough edges & the slider fit between the 2 rows of tape. At the top of the channel, I stacked 2 foam squares to act as a stopper. The stopper does not have the top backing removed or the slider would stick & not move over top of it. I added more black tape & foam squares along the top.
I cut a small piece from a Darice sticky back magnet sheet & adhered it to the back of one of the small ghosts. The other ghost was adhered to the tree. I punched 2 bats from Martha Stewart's Vampire & Bats in SU Basic Black. The small one was adhered to the left of the tree to cover the hole from the tree die. The bigger bat is adhere to the end of the slider after it was trimmed so it would barely be above the ATC. I decided it need something else so I die cut a Poppy Stamp Walking Cat in black & he's walking through the graveyard.
Now that all the embellishments are on, I removed the adhesive backing (except the slider stopper), put the magnetic slider in place & put it on the SU Elegant Eggplant ATC base. Now all you have to do is gently pull on the bat at the top of the slider & watch the ghost come out from behind the tombstone & swirl up the tree. Push the slider down & he goes back behind the tombstone. Of course he may need a little help getting back home every now & then!
Hope you enjoyed my project as much as I did making it! TFL!!
Friday, September 16, 2016
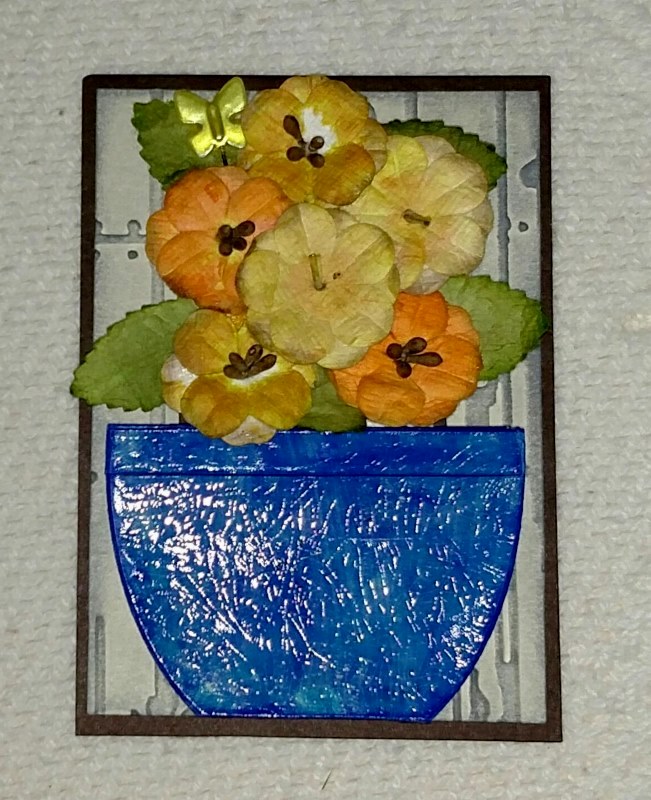
A Pot Full of Posies!
The SU Very Vanilla background is 3 3/8" X 2 3/8" & was placed vertically in Tim Holtz's plank texture fade & embossed. It was then inked using weathered wood & adhered to the 3 1/2" X 2 1/2" SU Baked Brown Sugar base.
The pot is a 3 1/4" X 2 1/4" piece of watercolor paper painted with antique linen. I put a small amount of mermaid lagoon, broken china & blueprint sketch paint on a craft sheet. Using Jennifer McGuire's Easy Distress Inking technique, I dipped my finger tips into the paints & tapped it onto the watercolor paper. Once dry I applied rock candy crackle paint for an aged effect.
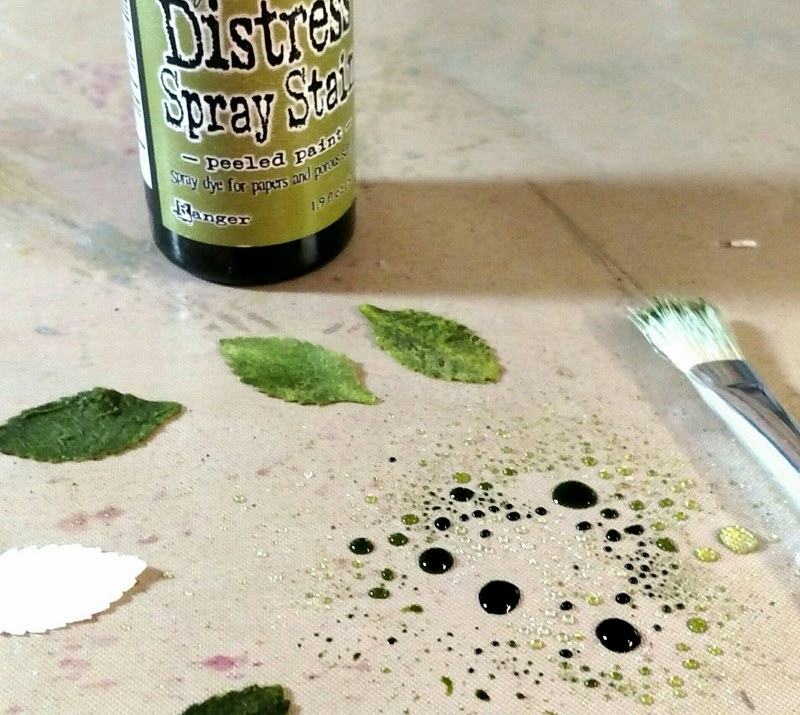
Next I die cut an oval then trimmed 1/4" off one end. That end was lined up with the 1 1/2" line on my trimmer & cut. From the center of the left over, it's cut 1/4" for the lip of the pot. All the edges were inked with blueprint sketch then the 1/4" piece was adhered to the pot. To adhere the pot to the background I used small dimensionals along the edges of the bottom & sides only.To stain the Petaloo flowers, I colored them using fossilized amber & carved pumpkin (not shown) spray stain. After spraying the stain on a craft sheet, they were spritzed with water. You can see in the photo that some of the stain is lighter as it pools up so depending where you pick up the stain with your brush the flowers will be lighter.
The leaves were done the same way using peeled paint spray stain. The leaves & flowers were air dried for awhile then finished drying with a heat tool.
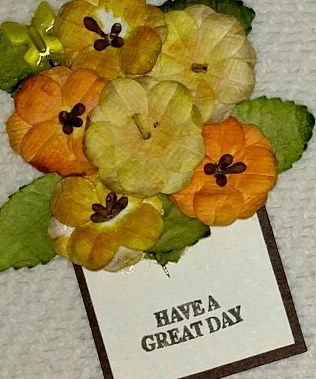
The 2" X 1 1/2" SU Very Vanilla was insert into the pot so I would know how to arrange the leaves & flowers. First the leaves were adhered using glossy accents. Once dry the butterfly stick pin was woven through the card stock so the end of pin was at the back. Double sided tape was used to adhere it to the 2 1/8" X 1 5/8" Baked Brown Sugar base. It was slipped back into the pot & the flowers were added being careful not to adhere it to the main base of the ATC. Once dry, the sentiment was stamped in Black Versafine.Hope you enjoyed my project & Have A Great Day!
TFL!
.
Thursday, August 11, 2016
Enjoy the Ride!
It was my turn to design the ATC for The Craft Shack's August ATC Club. Of course August is the last hurrah of summer so I wanted to do something with a beach theme...what's better than an amusement park ride on the boardwalk? I wanted to make a spinner card but nixed the idea when I realized I'd have to make the cars spin too!
The ferris wheel is from Taylored Expressions "Adventure Land" (retired). It's stamped with Memento Tuxedo Black on Elizabeth Crafts Design Soft Finish Card stock which is wonderful CS to work with. The image is colored with Copics (R27, R46, G17, B00, B06, Y35, C3). I fussy cut it out so I could pop it up & added a star brad in the center. I used the same CS for the background & blended tumbled glass for the sky & antique linen for the sand. I used a black marker to ink the smallest "seaagull" on The Northwoods Birds stamp. The boardwalk is a retired stamp from My Favorite Things "Western Backgrounds" stamped in vintage photo. Once the ATC front was placed on the SU Brown Sugar distressed base I added the sentiment. It's 1 line from a sentiment from the Taylored Expression set so I used a vintage photo marker to ink it & it's stamped on CS inked with tumbled glass then fussy cut it out.
TFL!
The ferris wheel is from Taylored Expressions "Adventure Land" (retired). It's stamped with Memento Tuxedo Black on Elizabeth Crafts Design Soft Finish Card stock which is wonderful CS to work with. The image is colored with Copics (R27, R46, G17, B00, B06, Y35, C3). I fussy cut it out so I could pop it up & added a star brad in the center. I used the same CS for the background & blended tumbled glass for the sky & antique linen for the sand. I used a black marker to ink the smallest "seaagull" on The Northwoods Birds stamp. The boardwalk is a retired stamp from My Favorite Things "Western Backgrounds" stamped in vintage photo. Once the ATC front was placed on the SU Brown Sugar distressed base I added the sentiment. It's 1 line from a sentiment from the Taylored Expression set so I used a vintage photo marker to ink it & it's stamped on CS inked with tumbled glass then fussy cut it out.TFL!
Thursday, May 19, 2016
Grandmother's Flower Garden Surprise Pop-up ATC
I designed this ATC for The Craft Shack's monthly ATC Club. A couple of the girls had seen another surprise pop-up ATC I had done several years ago, Scary Halloween & wanted to do the technique so I decided to do it in May before everyone got busy with summer activities. I had originally found instructions for a Surprise Pop-Up Card on Splitcoaststampers in their tutorials & I watched Beate's video tutorial at the bottom. I was going to size it down for an ATC but discovered in the comment section Cyndi Evans had already written them but I did make a few changes which are listed below.
When the ATC is closed & laying flat it doesn't look like anything special but...
Once you pull the twine you see a surprise message!

From the side you can see how it works a little better.
Here are the measurements I used:
When the ATC is closed & laying flat it doesn't look like anything special but...
Once you pull the twine you see a surprise message!
From the side you can see how it works a little better.
Here are the measurements I used:
• Base CS –
3 1/2" X 2 1/2"
• Slider
base CS - 3 3/8" X 2 3/8"
• DSP –
3 1/4 " X 2 1/4"
• White (for message) CS -
3" X 2"
• White slider CS– 3" X 2" (I used heavier weight CS)
• Stabilizer
- 6" X 1/4" copier paper
You'll also need a paper trimmer with scoring blade, adhesive runner, 1/8" double sided tape, 3/8" circle punch, an eyelet eyelet, Crop-a-dile, corner rounder, twine or ribbon, stamps, ink and embellishments of your choice. The Sweet 'n Sassy stamps I used are listed at the end.
I would recommend watching Beate's video (link above) for the complete instructions on how to put it together but below are a few things that worked best for me when I made the ATC size:
1. I used a lot of mono adhesive when I put the DSP on the slider base because of cutting it.
2. When I made my cuts, I cut with the DSP up for smoother edges. I also gently ran my blade up & down a few times before picking the blade up since it's a little thick.
3. The vertical cuts on the slider base started 3/8"' from the slider base top (before putting on the main base) & in 1/4" on each side. I cut down 2 3/4". (See photo below right)
4. I used the score blade on my trimmer since it's thick. I had problems staying in the groove when I tried using my score board. My glue tab is 1/4" wide.
5. Before I punched the half circle, I adhered the stabilizer as close to the score line as I could. When punching make sure you don't punch all the way through the stabilizer (see photo below left).
6. Your cuts may not be precise so I would make sure the slider is the right length before adhering to the 1/4" glue tab. It should cover the glue tab & not be able to be seen at the top when not pulled up.
7. I stamped the surprise message before adhering anything. Then I laid it on the base & held the slider base over it before adhering to make sure the message showed where I wanted it.. I had to trim the message piece a little.
8. In the video Beats tells you not to put embellishments on the glue tab. I did only because the piece of grass CS was a little flexible.
I hope you give this a try & if the first one doesn't work don't give up! As you can see from the one pictured above, I made a few prototypes before I was happy! TFL!!
Supplies: SU Certainly Celery CS, Whisper White CS, Springtime Vintage DSP, copy paper, Fiskars Paper Trimmer, Scrapbook EZ Runner Adhesive, 1/8" Scor Tape, Tombow Glue Pen, We R Memory Keepers Crop-a-dile Hole Punch & Eyelet Setter, Lawn Fawn Grassy Border Die, Memory Box Wrought Iron Fence, Sweet 'n Sassy Flowers in Bloom Stamp Set, Sweet 'n Sassy Flowers in Bloom Die, Sweet 'n Sassy Everyday Miracles Stamp Set (sentiment), Copics (R81,
R85, YG61, YG63, B21, B32, B34, E27), Clear Wink of Stella Brush (butterfly), Gold Wink of Stella Brush (flower centers), Versafine Onyx Black Ink, Memento Tuxedo Black Ink
Thursday, March 24, 2016
Flip or Flop
I heat embossed the sentiment, A Walk in the Sand by Great Impressions, using WOW Clear Embossing Powder on Whisper White. Then I sponged Pacific Point ink at the top & Crumb Cake ink on the bottom, blending them together in the middle. Using a tissue, I wiped the ink off the embossed sentiment. On the bottom of the card, I stamped Flip Flops & Sea Shells by Great Impressions in Crumb Cake then stamped it again on Whisper White. I colored the flip flops using the Daffodil Delight, Pacific Point & Real Red then fussy cut them out & used dimensionals to pop them up.
TFL!
Wednesday, March 23, 2016
Let 'em Eat Ice Cream
Last year, nine of us from our group, the NEPA Gigglers, decided to do a seasonal ATC swap. We are doing them quarterly so some of us will do 2 ATCs for a total of 12 & we'll place them in a 7 GYPSIES Artist Printer's Tray. This is my ATC for our spring ATC which is the 1st in the series.
We had specific SU colors to use: Pink Pirouette, Soft Sky, So Saffron, Wisteria Wonder, Pear Pizzazz, Whisper White. If needed, we could use small amounts of nueturals as accent colors.
"Lickable" by The Cat's Pajamas is stamped in black ink then colored with SU markers. Once the image was fussy cut out, I drew lines on the cone & put Glossy Accents on the scoops of ice cream. When I cut him out, his whiskers were cut off so I glued slivers of SU Basic Black were they were. The image is popped with dimensionals so I could put a tail on him which is part of a cotton ball. The grass is a Martha Stewart Punch. Of course, he'd rather have ice cream than a carrot so he threw it to the curb!
TFL!
We had specific SU colors to use: Pink Pirouette, Soft Sky, So Saffron, Wisteria Wonder, Pear Pizzazz, Whisper White. If needed, we could use small amounts of nueturals as accent colors.
"Lickable" by The Cat's Pajamas is stamped in black ink then colored with SU markers. Once the image was fussy cut out, I drew lines on the cone & put Glossy Accents on the scoops of ice cream. When I cut him out, his whiskers were cut off so I glued slivers of SU Basic Black were they were. The image is popped with dimensionals so I could put a tail on him which is part of a cotton ball. The grass is a Martha Stewart Punch. Of course, he'd rather have ice cream than a carrot so he threw it to the curb!
TFL!
Thursday, February 11, 2016
Valentine Delivery
This is the 2nd month of The Craft Shack's ATC Club & it was my turn to design the February ATC. The club will run for 12 months so at the end everyone will be able to display them in a 7 Gypsies Artist Printers Tray. I like to take a technique you'd normally do with a card & reduce it to ATC size so I decided on a shaker ATC.
As you can see in the photo above, the basic card is simple...SU Cherry Cobbler cut 3 1/2 X 2 1/2 for the base. The next layer is white card stock cut to 3 3/8 X 2 3/8 then stamped with Hero Arts Old French Writing Stamp in Tim Holtz Fired Brick Ink & the edges are distressed with ink.
Cupid was cut from Tim Holtz Gold Deco Sheet using Tim Holtz Mini Love Struck Movers & Shapers Set in the Movers & Shapers Magnetic Tray. By the time the heart shaker was put on Cupid was going to be to wide so I (literally) clipped his wings & tucked them behind his back just enough so he'd fit on the card.
To make the shaker heart, I punched a small heart using the EK Heart Punch then positioned the next to the smallest die from the LittleB Heart Die Set around the negative of the punched heart. From the same die I to cut the back of the shaker from white card stock & a piece of acetate. The 2nd heart is done by placing the smallest die, which only embosses, inside the open die to cut a solid piece. "Be Mine" was printed on white card stock punched out.
To finish the shaker, the acetate heart was wiped with a dryer sheet to remove any static then adhered to the back of the open heart using Glossy Accents. Be very careful not to use too much or it will squish out & smear on the acetate. Then I cut 3 slivers of foam mounting tape, starting at the top on one side, placed it slightly in from the edge on the acetate, shaping it around the heart. I then did the other side, starting at the top & finished with the piece at the bottom (shaped into a V). Make sure there aren't any gaps s0 the beads don't spill out. Using a spoon I placed a small amount of Red Pop Micro Beads in the cavity...you don't want to over fill or it won't shake. Next remove the strip from the foam tape & add the white heart, making sure it's lined up. "Be Mine" was adhered to the solid heart so the embossing shows.

Cupid & the hearts are adhered to the base using Tombow Mono Adhesive. To give Cupid's just a little dimension, his arm is popped up to hold the shaker heart & "Be Mine" is tucked behind the shaker. The 3 white pearls were the finishing touch.
Hope you enjoyed my card and try making one.
TFL!
As you can see in the photo above, the basic card is simple...SU Cherry Cobbler cut 3 1/2 X 2 1/2 for the base. The next layer is white card stock cut to 3 3/8 X 2 3/8 then stamped with Hero Arts Old French Writing Stamp in Tim Holtz Fired Brick Ink & the edges are distressed with ink.
Cupid was cut from Tim Holtz Gold Deco Sheet using Tim Holtz Mini Love Struck Movers & Shapers Set in the Movers & Shapers Magnetic Tray. By the time the heart shaker was put on Cupid was going to be to wide so I (literally) clipped his wings & tucked them behind his back just enough so he'd fit on the card.
To make the shaker heart, I punched a small heart using the EK Heart Punch then positioned the next to the smallest die from the LittleB Heart Die Set around the negative of the punched heart. From the same die I to cut the back of the shaker from white card stock & a piece of acetate. The 2nd heart is done by placing the smallest die, which only embosses, inside the open die to cut a solid piece. "Be Mine" was printed on white card stock punched out.
To finish the shaker, the acetate heart was wiped with a dryer sheet to remove any static then adhered to the back of the open heart using Glossy Accents. Be very careful not to use too much or it will squish out & smear on the acetate. Then I cut 3 slivers of foam mounting tape, starting at the top on one side, placed it slightly in from the edge on the acetate, shaping it around the heart. I then did the other side, starting at the top & finished with the piece at the bottom (shaped into a V). Make sure there aren't any gaps s0 the beads don't spill out. Using a spoon I placed a small amount of Red Pop Micro Beads in the cavity...you don't want to over fill or it won't shake. Next remove the strip from the foam tape & add the white heart, making sure it's lined up. "Be Mine" was adhered to the solid heart so the embossing shows.

Cupid & the hearts are adhered to the base using Tombow Mono Adhesive. To give Cupid's just a little dimension, his arm is popped up to hold the shaker heart & "Be Mine" is tucked behind the shaker. The 3 white pearls were the finishing touch.
Hope you enjoyed my card and try making one.
TFL!
Sunday, February 7, 2016
Victorian Garden ATC
The next layer is a beautiful Victorian looking DSP in a collection by Maja Design called "Let's Have Coffee" & is cut just 1/8:"smaller than the base. The stitching around the edges are from the Bo Bunny Stitches Set & inked with Tim Holtz Distressed Frayed Burlap. I used a Tim Holtz Paper Distresser on the edges & sponged them with Frayed Burlap then adhered it to the base.
On the last layer, I die cut a small oval using the Spellbinders Ovals Die Set so the paper would show from the 2nd layer. It was also stamped with stitching, distressed & inked around the edges. Before attaching to the other layers, I used Glossy Accents to place a small piece of gauze on the back then popped the layer up with thin foam squares.
The final step was the embellishments. The Memory Box fence was trimmed before adhering using a Tombow Glue Pen. Next I added a little strip of DSP which is the reverse of the Maja Design "Let's Have Coffee" stamped with stitching & over top of that is a metal embellishments attached using micro glue dots. The Cheery Lynn Flourish was die cut from SU Old Olive then cut in half & used on each side. I attached 2 Kaisercraft Mini Paper Blooms which were pressed down & a sprig of pearls is tucked behind the flourish.
It ended up being a little...well a lot bulky but I have to say I was very pleased with it!!
TFL!!
Friday, December 18, 2015
Sweet Happy Birthday

This ATC was inspired by a project I did in a Clear Scraps class taught by Susan Frase at CKC Lancaster in July. The Clear Scraps Acrylic has a thin protective "skin" on both sides. Peel the "skin" off just prior to working on/or finishing your project. The swirled background was done by putting 4 or 5 drops each of Zig Pink & Silver Alcohol Ink on a blending tool with a felt pad (but don't mix the colors). I randomly pounced the blending tool on the back of the acrylic until the entire surface was covered with ink. The bright color shows through to the front of the card. For the front of the ATC card, I peeled off the "skin" then stamped the music background with StazOn Jet Black. If you don't like how it was inked or stamped you can use non-acetone fingernail polish remover to take it off then re-ink or re-stamp. The embellishments are "Happy Birthday" peel off sticker, white lace, birthday girl from a free image site, birthday cake DSP (both punched out & distressed), swirly clip, silver flower, pink gem. All the items are adhered to the acrylic using Zip Dry, other types of adhesives won't work on the acrylic. By the way Clear Scraps are made in the USA!!
Thanks for stopping by!
Supplies: Clear Scraps ATC Acrylic Cards ; Zig Alcohol Ink ; EK Tools 1" Square Punch ; StazOn Jet Black ; Beacon Zip Dry Glue ; Ranger Ink Blending Tool ; Tim Holtz Adiondack Alcohol Ink Blending Felt
Wednesday, March 27, 2013
Lively Little Critters
This is a punch art ATC (1 of 20) I did for the Gigglers as a thank you gift for attending my SU party. I was inspired by a card on Splitcoast Stampers done by France Martin. I though it would be fun to make a miniature version with a few changes. I know bunnies don't have their borrows in trees but Iet's pretend! I used Tim Holtz's Wood Grain embossing folder with a technique we had recently used at my SU party. Using an ink pad, ink the inside back of the embossing folder (if your folder has sharp bumps like Dotted Swiss, ink a stamp block & run is over the folder or it may ruin the ink pad). Then put the card stock in the embossing folder & run it through your machine. I used Chocolate Chip ink & Close to Cocoa card stock. This technique gave the wood grain some depth. I then used a circle punch to make the "burrow". The punched out circle is inked with Chocolate Chip to make the inside of the tree look darker & then placed behind the bunny. The bunny is done with different size oval punches. The white card stock is sponged with ColorBox Gray Whale & the pads of the bunny's feet are Pretty in Pink & sponged the same color. The grass is a punch by Martha Stewart. I used a screw head brad to attach the tag to the tree. The tail is a 1/2" pom-pom attached with a glue dot & the toes are drawn with a marker. Thanks for looking!
Supplies: Card stock-SU Chocolate Chip, Close to Cocoa, Garden Green, Whisper White, Pretty in Pink; Ink-SU Chocolate Chip, Pretty in Pink, ColorBox Cat Eye Gray Whale; Embossing Folder-Tim Holtz's Wood Grain; Punches-Martha Stewart Grass, SU 1 3/4" round, 3 sizes of ovals, jewelry tag; Stamps-SU Tiny Tags; Brads-Karen Foster mini screw brads.
Wednesday, October 10, 2012
Scary Halloween Pop-up ATC
This ATC is for a swap the NEPA Gigglers are doing at Mary Ann's (Geraldinesmom) SU party. I saw a tutorial for a Surprise Pop-up Card by Beate on Splitcoaststampers & I thought an ATC would be cool. Cyndi Evans has posted the ATC dimensions at the bottom in the Question & Comment section. I highly recommend watching the tutorial before starting. This will give you the entire process (which I'm not going to type) plus if you use my dimensions then they will make more sense. I did make changes to fit my design. Here are my layers: Perfect Plum base - 3 1/2" X 2 1/2"; Basic Black - 3 1/4" X 2 1/4", Brown - 3 1/8" X 2 1/8", DSP - 3" X 2", black slider - 2 7/8" X 1 3/4" , paper slider guide - 4" X 1/4". I used DSP so it would look like grass & mounted it on the black leaving a 1/8" edge. I then cut through both layers, 1/4" from the edge of the DSP making 2 cuts 2 1/2" long &1 cut 1 1/2" wide. I found cutting with the DSP up worked best so I could see what I was cutting & it kept the cuts smooth. I didn't want to make pencil marks on the DSP so I used the lines on my cutter & the blade as a guide. I only added the brown layer so it would look like a grave for the "surprise". The ghost is stamped & hand cut. He's woven in through the tree which is cut from the Cricut. I used 2 layers for the trees because their size (2 1/2") made them very delicate. In front of the tree is a Memory Box die cut wrought iron fence which I trimmed on one side. Then I popped out the tombstone & pumpkins. The pumpkins were colored with Copics & then I used Crystal Effects for a little dimension.
Here is a side view when the slider had been pulled! Cute huh? I enjoyed making this into an ATC but I do think by adding the DSP it was a little harder to cut. If you've never made one, I'd recommend doing a card first. A big thanks to Mary Ann for cutting the trees out and letting me borrow her stamp set. She's the queen of Halloween!!
Supplies: Card stock - SU Perfect Plum, Basic Black, Basic Brown, Whisper White, DSP Cast-a-spell; Stamps - Spooktacular Greetings; Cricut - Happy Hauntings; Die - Memory Box Wrought Iron Fence; Misc - SU Whisper White Ink, Copics, bright green eyelet, SU Black Hemp, SU Crystal Effects, dimensionals, double sided 1/4" tape.
Thursday, June 21, 2012
Pretty Lady ATC
ATCs are one of my favorite things to do. This one was for a swap at the Ilion, NY gathering in February. I used Copics to color in the image. I'm still in the process of learning how to shade. One minute I have it and the next I don't. I really enjoy coloring so I'm not giving up. I used Crystal Effects on her lips for glossy lipstick and a jewel in the center of the flower in her hair for a little sparkle. Her necklace is half pearls. There were 24 in the series.
Supplies: Stamp - Outlines Rubber Stamp Co (I was very disappointed to visit their website and found they are closed for business); Cardstock - SU Black, GP White; Other - Martha Stewart Micro Beads; Copic Markers; SU Half Pearls; Art Institute Glue
Wednesday, June 20, 2012
Wizard of OZ ATC
Subscribe to:
Posts (Atom)


T