I'm usually not one for 3D paper craft projects but since it's a Christmas ornament I was in. I made 12 of them for a Christmas ornament swap at our annual shoebox event. The theme was Have A Holly Jolly Christmas so this die couldn't have been more perfect!
I started with a 3" wooden hoop & took it apart. The inside hoop was traced onto the back of the cardstock. The front of the cardstock has holly leaves & berries.
I fussy cut all the circles but don't ask me why I didn't use my Cricut.
I ran a thin line of
adhesive around the edge of the inside hoop & added the card stock over it. They were then set aside so the adhesive was completely dry.
I trimmed the card stock as close as I could.
I used a file to clean & smooth the edges. I did this by going down over the edge at an angle. A dusty job but it's kinda fun!
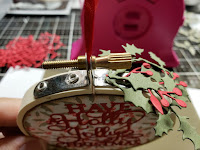
The edges were inked with
frayed burlap then the hoop was reassembled.
I cut 3X3 pieces of SU Real Red cardstock & back it with
Stick-it. This is a double sided adhesive.
I used my
Sidekick to die cut Have A Holly Jolly Christmas by Creative Expressions Festive Craft Dies.
Because the cardstock had Stick-it on the back, I removed the release paper from the die cut to reveal an adhesive backed die cut.
I centered the die cut on the cardstock that had been adhered to the hoop.
For each side of the ornament, I arranged 2 sprigs of holly leaves & 1 stem of holly berries. They are adhered them together with
mini glue dots. Isn't that a cute
glue dot dispenser?
The holly & berries were then adhered to the top of the hoop with another glue dot. They are very delicate but can be rearranged a little since the glue dot is flexible.
I cut 9" of 1/8" ribbon, threaded it through the bracket at the top of the hoop & made a loop to hang the ornament. I then tied another 9" of ribbon around the metal top of the hoop & tied a bow then trimmed the ends.
TFL!


