Many years ago, my sister (-in-law), Judy, Retired2stamp, invited me to a Stampin' Up Party. I was drawn to the 6X6 recipe card swap our local group was doing and had wanted to scrapbook too. I wasn't really interested in card making because I had witnessed my brother (in-law) Ed fold up a handmade card and put it in his pocket. I almost fainted and I didn't even make the card. But after a few parties, I was hooked and now make more cards than I had ever thought I would. My most recent passions are ATCs, tags & altered art. As you look through my blog I hope you can see how I've grown in my crafting ability!

Thursday, December 20, 2018

Noel

This is my last Technique Tag Tim Holtz Style Class for 2018 & actually I won't be doing one for a few months since I'm now a snowbird!  It was funny that I chose to do Tim's custom colored rock candy glitter from his 12 tags of 2012 October then he does a re-make & introduces his new & oh so awesome Glitter Duster!


Following Tim's directions in the link above, I made 2 custom glitters by adding Crimson & Aquamarine Alcohol Inks to Ranger Rock Candy Dry Glitter.  It's so easy & you can make as little or as much as you need.

The technique tag is a #8 inked with tumbled glass, peeled paint & dusty concord distress ink then spritzed with water to blend the colors & add water droplet marks.  Once dry, it was stamped using Classics #1, Classics #2 & Classics #4.  The Aquamarine custom glitter was added to the dragon fly's wings by brushing it with collage matte medium.  I didn't quite get it covered so I went back & added a little more matte medium & as you can see it did clump a little bit.  So when brushing a medium on, make sure you have good coverage.  If done correctly you can still see the veins of the wings through the glitter!  Very beautiful!

The decorated tag is a #10 which was covered with forest collage paper using collage matte medium.  It's not shown here but before it dried the paper was "crinkled" up to make ridges. 
The collage paper was then inked with tumbled glass, peeled paint & gathered twigs then spritzed, 


Now the fun!  Using Tim's new splat box, the tag was sprayed with resist spray then generously sprayed with rock candy glitter using the glitter duster.  Unfortunately the photo doesn't do it justice but the spray of glitter is very fine & evenly distributed,  This is such a genius way to dust your project with glitter!


The bigz vintage noel die was cut from grunge board & inked with candied apple. The crimson glitter was adhered to the noel die cut by spreading glossy accents over the inked grunge board & spreading around with my finger.  After sprinkling the glitter on, it was gently patted into the glossy accents. The excess was shaken off & put back into the jar. The glossy accents did absorb into the grunge board so the glitter didn't cover the entire die cut but it gives it a distressed vintage look.

Several different mini holiday greens were cut from coredinations kraft core paper then sanded.  There are also beaded berries which were dipped in candied apple spray stain,   Everything was adhered behind the noel die cut using glossy accents.  It was then popped up on the tag using dimensionals.

To finish up, a couple of piece of Christmas ephemera were inked & crinkled up before adding.  The crinkle ribbon was inked with peeled paint & tied with cream & red jute.  The pine cone was rubbed with matte medium & sprayed with glitter then hung from the ribbon with a loop pin.  The pine cone just glistens & looks so pretty!


Well that's it!  Thanks for looking & hope you have a wonderful Christmas!

Monday, November 12, 2018

Sleet & Snow ATCoin

My first attempt at making ATCoins for a swap!  Lots of fun!


The coins were cut from coaster board using a 2 1/2" BigZ die & pieces of various  tissue wraps were cut big enough to cover the circles. Matte medium was brushed onto the coaster & tissue wrap then they were adhered together making sure the edges were well covered.


After they dried, the tissue wrap was trimmed & the edges were sanded to remove any rough edges.


They were inked using distress chipped sapphire & a little dusty concord.


Then Umbrella Man was stamped using black soot archival ink.  This is a DIY ink pad & is also the best to stamp on acetate with.  It's definitely black without that hint of blue.


Various stickers were placed a little off the edge then trimmed.


I recently saw a technique to make rain but I'm sorry now I can't find who to give credit to.  She used a chalk marker but I didn't have good luck with it so I used the small end of a stylus dipped in picket fence paint & swiped it across the surface at an angle.  To seal the coins & give them a wet look, they were sprayed with resist spray.

Hope you enjoyed my ATCoins.

TFL!!

Sunday, November 11, 2018

Merry Musical Christmas

Just love CAS cards!  This was my shoebox project for an event I attended. 

Before die cutting "Merry Christmas", I ran the cardstock through my Xyron so it would have an adhesive back.

After stamping & die cutting the holly, I colored the ribbon with gold Wink of Stella & added red Stickles over the berries.

Unfortunately the SU music DSP is discontinued but you could make it by masking & using a background music stamp.


This was a fun easy card to make!  Thanks for looking!


Supplies:  Neenah Premium 110 lb Extra Heavy Cardstock, SU Cherry Cobbler & Garden Green Cardstock, SU Merry Music Sampler DSP, Tim Holtz Alterations Retro Merry Christmas DieTim Holtz Stampers Anonymous Tattered Christmas Stamp Set Tim Holtz Alterations Tattered Christmas DiesGold Wink of StellaRanger Christmas Red SticklesXyron Create-a-Sticker Max

Wednesday, August 29, 2018

Flowers for Your Birthday

I made these birthday cards using Tim Holtz Alcohol Lift-Ink Technique for the Giggler's August birthday girls, Judy & Robin.  Lots of fun & its like a BOGO sale!!


How I did it:
Following Tim's instructions, I started by creating a background on Ranger White Alcohol Ink Yupo Cardstock with Aquamarine, Dandelion & Bottle alcohol inks.  Using my Tim Holtz Stamp PlatformI stamped Hero Arts Everything Flower stamp using the alcohol lift-ink onto the background.  To transfer the ink, I immediately stamped the  image onto a  piece of Neenah Premium 110 lb extra heavy cardstock.  I then went back to the original background to blot & dab the image off.  The "happy birthday" was cut from thin foam from the Dollar Tree using Tim Holtz Alterations Celebration Word Script then run through my Xyron sticker maker.  I liked being able to bend the "birthday" into an arch.  I thought the green sentiment needed something to stand out so I brushed it with Clear Zig Wink of Stella.  To finish them off, I added a few pieces of Neat & Tangled Sequin with Ranger Glossy Accents.  It was then mounted on another piece of white cardstock and SU! Tempting Turquoise. 

What worked best for me:
I've practiced this technique several times & since you need to work quickly having a design plan helps.  I like using medium to dark colors because the lighter colors looked washed out on the white Yupo.  I was also impatient so I ended up with a few smears & rubbed to much ink off because I didn't listen to Tim...make sure the alcohol ink is dry before stamping; most important is to blot the ink off until it's no longer shiny before you start to dab or rub & always have a clean spot on your paper towel.

I can see this being a technique I'll use over & over again!  TFL!

Wednesday, January 31, 2018

The Scenic Route

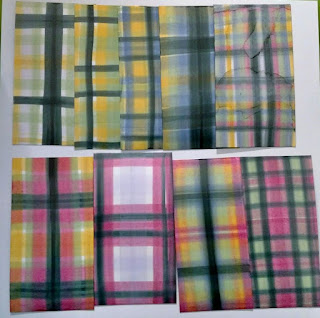
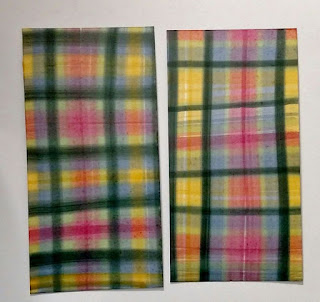
Each month I'm doing a technique from Tim's blog so for January I decided to try my hand at making a plaid background. I followed his directions from 2009's 12 Tags of Christmas Day 3 to make a sample on a #8 tag with directions on the back. This will be be stored in my binder for future reference. Then I made a #10 tag which I embellished. I won't go through the entire technique but you can follow the link above to see it from the man himself! Below, I will tell you about my experience & some of the things I tried.

I had limited colors of alcohol inks but it was amazing at the combinations I came up with.  I will say this is addicting & I kept doing "just one more".  My Cranberry came out pink & I just couldn't get it to be a darker.

These are my practice pieces & are a little smaller than a #8 tag.  I tried dropping blending solution on the top right piece so there would be a place to stamp.  It ran a little & I probably should have used another drop or two to make it a little lighter.


These two are about the size of a #10 tag.  Since it was a larger surface I had trouble holding it straight at first.


Making these diagonal samples were really fun but I need a little more practice so they're straight.


You do want to use less Black Soot, a little does go a long way. When putting the ink on the felt, it will wick some so be careful or you'll have a very wide stripe.

The 2 hardest things are keeping the blending tool straight while pulling it across the CS & reversing the direction. 1.) I think I may try to adhere the glossy CS to something then use a straight edge to guide the blending tool. 2.) Tim's direction said to turn the tool around AND reverse the direction. Unless I read it wrong I thought it meant to pull the tool towards me then push it away from me, in the other direction. I just couldn't do the reverse motion but I think it came out good by turning the tool & only pulling it down the CS. Of course I probably could have turned the CS too!

Although I used a craft mat, I also placed a piece of scrap paper under the CS. I found this helps keep my craft mat from staining. The blending solution does take it off but if there are any cracks or cuts it's hard to get the alcohol ink off.


Friday, January 19, 2018

A Lovely Bunch of Coconuts

My latest recipe card is for coconut cream pie & it came from my nephew, Sean. I made the pie for my youngest son's birthday & decided it would be a good companion recipe card for Pam's Pie Crust that I did a few months ago.


It's hard to believe I didn't have any DSP that fit the recipe so I made my own background with a flourish stamp...can you envision the monkey swinging through the trees? The coconut tree trunk is a 1/2" strip of CS that was torn in small pieces then overlapped & adhered back together. The leaves were hand drawn then fussy cut.  I used fringe scissors, cutting at an angle to finish them off. I collaborated with my bestie, Lisa to design the coconuts.  We used a grass stamp on CS then embossed it with a flat EP.  Once cool, 3 circles were punched out then fussy cut around the edge so it didn't have a perfect shape. We used a stylist so it had a slight curve then they were added using dimensionals. The monkey was colored with Copics then fussy cut out & is holding a sauce pan brad.

Thanks for looking & hope you enjoyed my project!


SUPPLIES: SU Cardstock - Chocolate Chip, Vanilla, Wild Wasabi, Pumpkin Pie, Crumb Cake; Ink - Ranger Archival Jet BlackTim Holtz Shabby Shutters; Stamps - Hot Off The Press Cute Monkey, Tim Holtz Stampers Anonymous Sketch Elements, Judith & Heather Grass ; Misc - SU Fringe Scissors, Eyelet Outlet Pan Brads, Heartfelt Creations Flower Shaping Essentials, Copics E53 & E57, Tombow 992, WOW Clear Embossing Powder.