Many years ago, my sister (-in-law), Judy, Retired2stamp, invited me to a Stampin' Up Party. I was drawn to the 6X6 recipe card swap our local group was doing and had wanted to scrapbook too. I wasn't really interested in card making because I had witnessed my brother (in-law) Ed fold up a handmade card and put it in his pocket. I almost fainted and I didn't even make the card. But after a few parties, I was hooked and now make more cards than I had ever thought I would. My most recent passions are ATCs, tags & altered art. As you look through my blog I hope you can see how I've grown in my crafting ability!

Wednesday, June 21, 2017

Lifetime

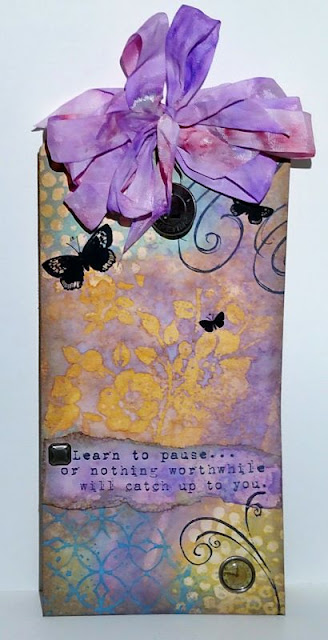
This is another technique Tim Holtz taught in a class I took in April using his new Oxide Distress Inks. We used the technique in the monthly Technique Tags Tim Holtz Style Class at The Craft Shack

I picked up a small amount of Distress Micro-Glaze with a mini blending tool & rubbed it on my craft sheet to smooth it out & take some off.  Then applied a thin layer over Tim's Bubble Stencil in a tapping & twisting motion.  The micro-glaze goes along way & Tim recommended having a blending sponge dedicated to the micro-glaze & leave it in the container.  I smooshed Broken China & Spiced Marmalade Oxide Inks on my craft sheetspritzed it with water then swiped my tag through the color.  After drying it with a heat tool & dapping a little with a cloth, I added a little more color & dried it again. Then I used more micro-glaze over Tim's Floral Stencil in the middle of the tag then swiped it through Wilted Violet, Cracked Pistachio & Peeled Paint Oxide Inks.  I dried it & added a little more of those colors.  After drying, I decided to use another stencil, Latticework with the micro-glaze & more Broken China Oxide Ink.  I blended Frayed Burlap Ink around the edges.


After I was happy with the stencils & Oxide inks, I used another tag I had inked with Worn Lipstick & Wilted Violet Oxide Inks & spritzed with water.  Then I stamped the sentiment from Tim's Just Thoughts with black Archival Ink, tore & inked the edges with Frayed Burlap Ink. The swirls are from Tim's Sketch Elements stamp set stamped with Archival ink too.  The other embellishments are crinkle ribbon inked with Wilted Violet & Worn Lipstick Oxide Inks, a Muse Token "Lifetime" hung on a loop pins, a nailhead& a clock from Tim's Custom Fasteners & 3 butterflies from Botanical Remnant Rubs.

TIP - This was a very easy technique but it's hard to see the flower pattern in the center.  I think I may have used more of a grinding motion instead of tapping & twisting when I applied the micro-glaze so it may have gotten under the stencil.

Hope you enjoyed my tag & TFL!


Thursday, June 15, 2017

Lighting Up Your Birthday

Our stamping group, the NEPA Gigglers have 4 birthdays in June & this year I'm making everyone a card that lights.  Of course I want them all to be different & now I have 7 complete out of 15.  The obvious is a cupcake & I have a LOT of cupcake stamps but I did find another subject which fits perfect for 2 of my friends.

I used Chibitronic White LED Stickers, copper tape & a pancake battery on all the cards.  Here is a previous card I made that shows how I did the circuits.  TIP - to take the guess work out of placing my LED sticker, I stamped my card front using my Misti then stamped another piece of CS that was the same size to put the circuits on.

This is the 1st card for my SIL, Pam.  I used SU Ice Cream Parlor DSP & Pacific Point CS.  The stamps are from SU Create A Cupcake using matching inks.   The balloons are Marvy punches.

Elaine's card was next & I didn't stray from the cupcake theme.  I used SU Sprinkles of Life (cupcake), Starburst Sayings (button) & Birthday Greetings (sentiment) stamps sets with Ice Cream Parlor DSP & Pacific Point CS.  I colored with Copics & punched with SU 1" round & 1" scallop.

The next card I made was for Shannon & the camper from SU Loads of Fun was perfect because I could have a light in the window plus she loves to camp!  I used SU Birthday Basics DSP with Raspberry Ripple CS.  The trees behind the camper are from SU Lovely as a Tree, the button is from SU Starburst Sayings & the sentiment is from SU Birthday Greetings.  I colored the camper with Copics & used SU's 1" round & 1" scallop punches..

This was the last card I made & it was for Kathy who also loves camping.  I used the same supplies but decided to draw a "porch light" on the side of the camper.  I told them Shannon was inside crafting & Kathy was still by the campfire.  Oh & I stamped the camper first then masked it off before stamping the trees.

Now all I have to do is come up with 8 more ideas!  Hope you enjoyed my creations & TFL!

Friday, June 9, 2017

A Bowl of Yum

Time for the June recipe card class at The Craft Shack!  This tasty recipe was submitted by Diane Z. & I designed it with a little inspiration from Pinterest. I've never done anything with an Asian theme & I really like out it turned out. 
The bowl was made following Alex's Creative Corner idea by punching SU Rose Red CS using the SU Designer Label Punch then cutting it about in half.  It was stamped in black Archival Ink using the corner stamp from Penny Black's Oriental set.  The bowl was trimmed using SU Basic Black CS.  The chopsticks were hand cut from SU Natural CS & attached to the back of the bowl then it was popped up.
The idea for the hanging screen came from Maylee's lantern card.  The branch from Penny Black's Oriental set was stamped at an angle with black Archival Ink on SU Rose Red then run through a paper crimper.  It was trimmed so there were tabs at the top, & bottom for the hand cut fringe.  It's decorated by punching SU Basic Black Cardstock with a SU Scallop Trim punch & adhered to the back using Scor Tape.  The tiny white pearls were colored with gold Wink of Stella then placed at the top & bottom.. 
The lanterns from the same Penny Black set were stamped with Memento Tuxedo Black Ink, colored with copics YG63 & R85 , fussy cut out then the fringe was cut apart.  Clear Wink of Stella over the leaves gave it a little sparkle & a line was drawn on the DSP with a gold marker to "hang" the lanterns.  (Ignore the little white spot on the right lantern it's not on the original?)
The SU Very Vanilla recipe card & SU Basic black mat were cut with the SU Window Framelit die.  The black mat was cut in half then adhered to the back of the recipe card & popped up.                                                                                                                         After adhering the gold trim ribbon to the center of the Bazzill Glamorous Vintage Lace DSP it was matted in SU Basic Black then all the elements were adhered.                                                                                                                                                                  TFL!!

Wednesday, June 7, 2017

Distress Ink Technique Binder Notebook


In April, I was lucky enough to take a class with Tim Holtz. He taught several techniques using his new Distress Oxide Inks from Ranger. I decided to make a divider tag to put between my Creative Chemistry Distress Ink tags & the Distress Oxide Ink Technique tags in my Idea-ology Worn Binder Notebook.  I figured there was no better way to ink it than color blocking using all 12 current colors!

I used the "direct to paper" (DTP) technique by pressing the ink pad directly onto a Ranger #8 tag.


Then using Ranger's Distress Sprayer I spritzed it with water & dried it with a heat tool.
Not all 12 colors would fit separately on the tag so I left a little "white space" between the "bottom" colors.  Then I added the "top" colors, inking over the "white space" & overlapping the colors on each side.  I dried after each color was added so they would be layered & not blended. After the entire tag was covered you could really see how the layering worked.

I stamped the title in Ranger Jet Black Archival Ink using Tim's Worn Text Stamp Set from Stampers Anonymous.  I also typed some of the oxide ink tips Tim had given us in class & on his videos then adhered it to the back of the tag.


The finished technique tags were then placed in Idea-ology Page Pockets & stored in my Idea-ology Worn Binder Notebook.  The cherry on top was Tim & Mario autographing my notebook!


It was an awesome class, the companies were so generous with their products & Tim's a fabulous teacher!! Oh & I can't forget Mario, he  made the labels for the notebook plus keeps everything organized before & during the classes!

TFL!